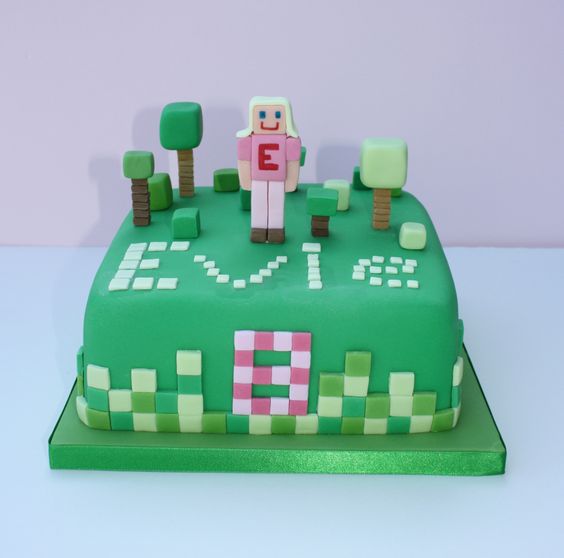
Evie’s Minecraft Birthday cake
Minecraft is absolutely massive in our house. In fact I’d go as far as saying it’s my strongest bargaining tool. “If you don’t finish your homework there’ll be no Minecraft!” Works every time.
This isn’t my first Minecraft birthday cake – it’s actually my third but it is the first one for a girl. Evie is the cutie who I bake gluten free cakes and biscuits for when there’s a school cake sale. I can’t stand the thought of her missing out on cake!
Gluten Free Madeira cake
This cake is a gluten free Madeira cake. Having made a few gluten free recipes now I know that I get the best results by swapping out regular flour and replacing it with 50% gluten free flour and 50% rice or almond flour. It just works better. Sometimes I add an extra egg after I was advised that gluten free flours make cakes more dry and an extra egg makes “all the difference”.
This is the Madeira cake recipe I used.
I wanted to make it quite a cute Minecraft birthday cake without any weapons so I went for the trees and bushes route with a pretty pink ‘Evie/Steve’. Evie seemed pretty happy with it when she saw it.
Although quite a simple design don’t be fooled by it’s simplicity. Cutting and positioning all those squares takes time – but that could be because I was watching Netflix whilst making this cake and that always slows me down!
How to make a Minecraft person
It’s really easy to make a Minecraft person if you have plenty of time to leave it to harden. That’s the key to being able to handle the model and it not break.
I start by rolling out the sugar paste and cutting out the body and sleeves. To give the legs more strength I make one large rectangle and use a cutter to make an indent where the legs separate rather than cutting two separate legs and sticking them together. Insert half a cocktail stick into the top of each leg with a little edible glue and insert into the body.
Use edible glue to stick the sleeves to the body and then do the same with the arms and head. Insert half a cocktail stick into the bottom of each leg once you have glued the feet in place. Finally add the head. Check that the model will stand up straight as you go by standing it in a polystyrene block with something for it to lean against so it’s at 90º.
I wrapped the whole model in cling film so it would stick in place and left it over night to harden.
To make the trees I cut out squares of brown sugar paste with a plunger cutter and made holes in the centres so I could insert cocktail sticks into them. I threaded the squares onto the sticks; gluing as I went, until I had a few in a row. The sticks were then inserted into the polystyrene so they were upright and could harden over night. The large green tree tops and bushes were made from larger squares of sugar paste which had holes made in the bottom and were left to harden. The harder the green tops and brown tree trunks are the better as they won’t collapse so easily so try to make these in advance.
The outer edge of the cake was surrounded with three colours of green square so they looked like grass- kind of!
An ‘8’ was added to the front of the cake using pink squares.
Once the model had hardened and could be handled the hair was added and the face was painted on. I added an ‘E’ for Evie onto the body.
Then all the elements are added onto the cake and that’s it.
I hope this has been helpful.
Have you made a Minecraft cake? Are you about to? I’d love to see it. Just head on over to the CakesBakesAndCookies.com Facebook or Twitter page and post a picture to share with us bakers. I’m sure we’d all like to see them. Follow the links below.
Bye for now
EmmaMT
More Baking Tips you may like
How to cover a cake in sugarpaste, and make it really smooth!
Buttercream Recipe for Different Size Cakes
How to make coloured sugar decorations
Kitchen Gadgets Review: Russell Hobbs Aura 6 in 1 hand held blender


Just brilliant, my children have recently got into minecraft they would love this cake.
Gorgeous cake! Thanks so much for the gluten free recipe too! Cristina O’Halloran