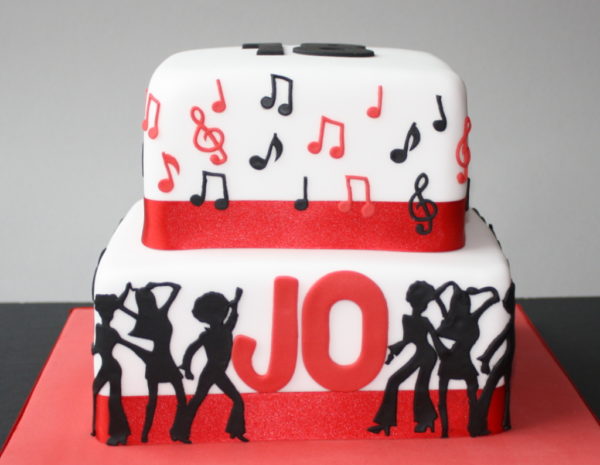
I wish I had a £1 for every time Tim walked into the kitchen and told me that my cake wasn’t straight! It’s one of those things that I just can’t see. You should see the shelves in my house! If left to me they would all be wonky. I can’t even put the oven shelves back into the oven horizontally! So stacking a cake doesn’t come easily to me! There I said it.
Over the years I have learnt how to improve my technique and get a good result but it’s still work in progress. I kind of go with the thinking that once the cake is finished and decorated a few degrees off (as that is all it usually is) won’t show. What do you think? This is the last stacked cake I made. It was for my lovely friends daughters birthday. More on that in the next post.
How to stack a square cake
Start with your cakes leveled, buttercreamed and covered in sugarpaste. This is the trick. If you start with a straight cake your stacking will be a doddle! I use the side scraper (as shown in this post) to get the buttercream sides straight and at 90º angles which helps a lot. Then use spacers to get the sugarpaste rolled out to the same thickness.
Use a small amount of Royal icing in the centre of your cake board to secure the first cake in place.
Once the cake is in place check that it is central using a tape measure or ruler. Give it a gentle push till you are happy.
If you need to move the cake to reposition it do so soon after covering it as the sugarpaste will still be soft and any pushing and prodding can be removed with a cake smoother.
Insert dowling posts (I use Plastic Cake Dowels but you can still get wooden Dowels too) Try to push them in as vertically as possible making sure you leave enough space between them to give support to the cake to be stacked but not so far that they will be outside of the size of the next layer.
Mark each dowel where it hits the sugarpaste then carefully remove it. Cut the dowel at that mark. I use scissors and work my way around the post. Be careful that the last snip doesn’t send your dowel careering off in the direction of the cake! Been there. Done that!
Re- insert the dowels into the cake. They should be just visible from the top, so the next cake can sit comfortably on them without squishing the base cake. It’s okay if they sit in the sugarpaste a little. The dowels are really important when stacking heavy cakes or lots of tiers. Not only does it give you a secure stack but it prevents the base cake from becoming squished down and solid. I’ve had that happen before when I made a 6 layer rainbow cake from Madeira cake. The bottom two layers were only about 1″ thick at the start and by the time the cake was cut they were half that size! Sugarpaste is heavy! I should have put a thin cake board in between layers 3 and 4 and used dowels.
Add a small amount of Royal icing over each dowel and add your next cake.
As with the first tier, check that the cake is central using a measuring tape then smooth out any finger prints. The Royal icing will hold the cake in position.
Sometimes there is a little gap between the layers if the cake isn’t perfectly flat or the dowels stick out too much at one point. You can correct and hide this with small rolls of sugarpaste or you can pipe Royal icing into the gap. If you are adding ribbon and it will be hidden then I wouldn’t do anything. A ribbon the same colour as the icing will hide a multitude of sins.
To check if your cake is straight use a spirit level (one just for cake decorating- I have this pink one as I know Tim won’t nick it!) I place a scraper on the top of the cake to prevent it leaving too many marks. If it’s way off being straight then you can carefully lift the cake- as long as the Royal icing underneath it is still wet, and place a small ball off sugarpaste underneath the board until it is level. Again, you can pipe white icing into the gap between the base cake and the cake board of the next tier.
Finally add ribbon to the cake securing it in place at the back with a small amount of Royal icing. Try not to touch it while that Royal icing is drying as it is a bit temperamental!
To add ribbon to the cake board I use a Pritt stick all the way around the board.
EmmaMT
More Bakes you may enjoy
Chocolate cupcakes recipe with cherry goodness
Sultana scone recipe – the easy way
FAQ: Frequently Asked Questions

I think I can safely say that I would make a total pig’s ear of that!!! Cx
No you wouldn’t. You can see straight!
Brilliant tips, thank you so much! Until now I always though dowels were for attaching the cakes together, not for stopping them squishing each other. I consider myself taught (although not sure I’m brave enough to try them myself!!)
Ah someone with your decorating talent will find this a doddle! I bet you’ll get them all even too!
Your confidence is very kind! But so misplaced! I have a wedding cake to make in the summer… if I can’t find a suitable tiered stand then it might be dowels…!
It’s much easier than it looks. I used to find that I stood and stared at the cakes- scared to start but actually when you just get on with the stacking it’s not so bad. I’m also becoming a master of disguising cock ups!
I’ll take your word on them! You need to share these tips on disguises as well!!
Do you put each cake on boards ? Have been researching online & lots of sites say to . Just made my first tiered cake ( 3 ) and it’s reassuring to hear I’m not the only one who struggles with straight lines !!
Hello there,
I think it’s always a good idea to put each layer on a thin cake board – the ones that look like really hard cardboard. It gives you the peace of mind that the cakes won’t sink into eachother. The dowels you place in each cake sit on the boards, not on the cake so it’s much more secure.
Congrats on your first three tier cake. Thats a nice big one.
Let me know how you get on. I’m sure it’ll be a huge success
EmmaMT
Just discovered your website. What a gift of a find! Thank you. Shall be consulting you on my every endeavour from now on (and I’ve been making cakes for nearly 50 years!). There are always new things to learn.
I am going to attempt making my own 2 tier wedding cake the bottom one will be madeira and the top one fruit, but i am not sure what size each layer should be.There will be 70 guests on the day can you help me please.
Hello,
How fantastic to be making your own wedding cake. Right, I would say that to serve 70 guests you will want a 10″ round base cake (serves approx 50) and a 7″ (serves 25) or an 8″ (serves 30) cake on the top layer. Traditionally fruit cake is sliced into smaller portions than a sponge so you can get away with a smaller top cake which will give you a nice step to decorate.
Things to remember:
Fruit cake can be baked and decorated well in advance which is always best if the bride is doing the baking!
Also that Fruit cake is heavy so make sure you place the fruitcake on a cake board and support it with 4-5 cake posts in the Madeira cake (you can see how to in this post)
I hope that helps.
Good luck and if you get a chance I would love to see the end result. Feel free to post a picture on the CakesBakesAndCookies Facebook Page
EmmaMT