Cookie recipe Cookies Festival baking Wedding cakes

How to make Christmas tree cookies- The quick and easy way

Christmas Tree cookies

The cookie gift of giving

This weekend the girls are going to a Christmas party for the whole of Year One. I offered to make some cookies for the big event- this is our first Chrimbo party of the season so my first baking session (there are lots more planned!) I decided that as I need to make 40 cookies I needed to have a plan that would be really easy. In all they took in about 2 hours to make. Not bad for so many!

To make the Christmas tree cookies

You will need

1 x Vanilla cookie dough (see here for recipe to make around 30 cookies)

Rolling pin

Spacing sticks

icing sugar to dust

sugarpaste in green

cookie cutter

new damp sponge / damp kitchen roll will do

Spatula / cookie lift


To make the cookies


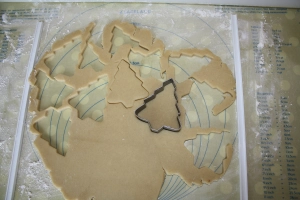
Roll out the dough between two spacing sticks to ensure that each cookie is exactly the same. Cut out as many trees as you can. Avoid over kneading the dough as it makes the texture tough.


The more cool the dough is, the less the cookie will spread when being baked. Load up the baking trays and pop them in the fridge for a while if the dough has become too soft.


Then bake the cookies until the edges start to brown and your whole kitchen smells like vanilla. Around 12-15 minutes. Leave to cool completely on a wire rack.


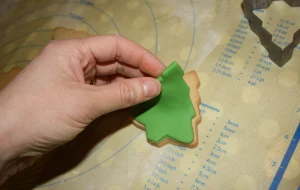
To ice the cookies, roll out a thin layer of green sugarpaste(about 3-5mm thick) Use the same tree cookie cutter to cut out each piece of sugarpaste. If the dough was cold going into the oven the cookies shouldn’t have spread too much and the green tree shaped icing will fit on top perfectly. To make sure that the icing stays put place it on a new damp sponge or dampen a piece of kitchen paper. Don’t let the sugarpaste get soggy.


Position the sugarpaste over the cookie. It may need a bit of tweaking to make it fit but it’s malleable at this stage and can be made to fit quite easily. Smooth down any icing that goes over the edge of the cookie as once it has dried it will be brittle and will break off.


Once in position smooth the sugarpaste with the palm of your hand then set aside to harden up a little. I leave them overnight.

Decorating the Christmas tree cookies

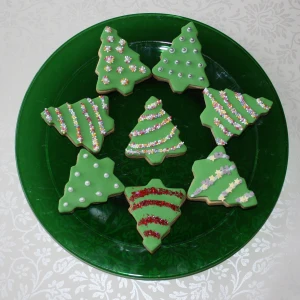
There are so many options when it comes to what you can then do to decorate these Christmas tree cookies. I did a load of different ideas but the world is your oyster.


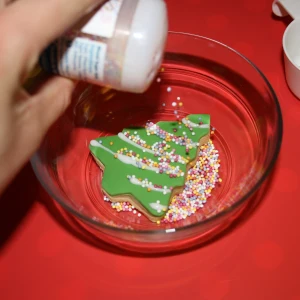
I made up a small amount of royal icing to make the balls and sprinkles stick. I used my new toy, the Leuke Decomax icing kit (more to come on that later) silver and pearl balls, red edible glitter and multicoloured sprinkles.


I iced lines of royal icing across the tree.

Diagonal lines worked much better than straight ones!

Then I added the sprinkles. These ones were from the supermarket and looked so much better than I expected.


The glitter worked well too but made a lot of mess! Once dry I had to dust off in between the lines of glitter with a paint brush.


Individual dots of icing were great for holding the silver balls in place. On some I made the dots of royal icing bigger, added a ball and then added sprinkles on top. These were my favorite ones!

I had to do these when my daughters weren’t around or I wouldn’t have got a look in! It is so much fun to do.

Once you have finished decorating the cookies leave them overnight to dry, then bag them up in cellophane bags with festive ribbons. They make the perfect personal Christmas gift.

I can’t wait to take these to the party on Saturday!

What are you baking for gifts this Christmas? I’d love to know.

 
Christmas Tree cookies
Kids birthday cakes

How to make Beau’s sleepover cake

How to make a simple sleepover cake Beau was eight years old on Monday. Her birthday cakes have got more and more detailed and adventurous  as I have got more experienced and she has got older. When asked what cake she wanted this year she said “ I want a two tier cake like a …

How to make a football shirt
Birthday cakes Cake decorating How to...

How to make a football shirt cake

How to make a Football shirt cake

How to make a football shirt


To date, I have been asked to make three football shirt cakes and I think it will always be a popular design. Each one has been for a different team and each one has been a new challenge.

So far I have always used a Madera cake for this shape and I bake the cake in a rectangular tin. If you don’t have one tin large enough you can always use two square tins, but this makes it quite tricky when you need to lift the cake onto the board.

The first time I made this design (the Manchester United one) I shaped it so there was a big gap between the sleeve and the body and as I was so inexperienced the icing tore under the arm leaving gaps on both sides. I also didn’t roll the icing out thick enough – It took me a long time to master this trick. Icing should always be around 5mm thick before you even think about lifting it up over a cake. That way there will be plenty of give and it will stretch without tearing much more easily. After three failed attempts I had to patch the holes with more icing which didn’t look great! That’s when I came up with the idea to have a scarf over the cake to disguise any holes, but it has now become a feature. Don’t you love it when a great idea comes out of a huge disaster

Since that first cake I have always made sure that the arms of the shirt are positioned close to the body so there are no awkward crevices to fill and no torn icing!.

Before I start a football shirt cake I always check out the colours and the logos on the shirt. If they really can’t be easily reproduced with icing I have them printed onto sugar paper with edible ink. Most cake decorating shops will do this for you for a small charge but you can email on line companies too, but that takes a lot longer! The print outs come on a sheet of edible paper and you have to cut out the badge carefully with scissors and then dampen the back. As it’s sugar paper it will become very sticky so it’s easy to position.

You will need:

A covered cake board

A Madeira Cake

Football shirt template cut from paper (see here)

Jam

Buttercream

Palet knife

Bread knife

sugarpaste / roll out icing

Icing smoothers

Letter/ number cutters

A damp sponge

To make the cake

Make a template by cutting a piece of paper to the same size as your cake tin. Shape the shoulders and neck then cut out the sides to reveal the sleeves. Make sure you don’t make the shape too intricate. Keep it simple.

How to make a football shirt

Cut the cake in half  through the middle and add the butter-cream and jam with a spatula. I always use seedless raspberry jam(heated up for a minute in the microwave to make it runny). Sandwich the two sides together and make sure that the cake is nice and flat.

Place the template on the cake and cut away the excess with a bread knife. I always put the first layer of icing on the cake before I put it on the cakeboard, that way I make less marks on the board. Do this by smearing a small layer of buttercream over the entire cake. Roll out the shirt coloured icing so that it will cover the length and sides as well as the width and sides of the cake with a little to spare. Lift the icing carefully – supporting it from underneath. When you lift up icing it stretches- a lot!- so the more you support it the better it will look on the cake.

How to make a football shirt

Once you have positioned the icing over the cake use a smoother to smooth all the areas. Use the cusp of your hands to do any corners and edges. Cut away the excess icing and neaten with a flat smoother.

Secure the cake on the cake board with a little royal icing. Keep in mind where you want the scarf or writing to go so there is plenty of space.

Next add the sleeves. I rolled out the black icing, laid it gently over the cake then marked where it needed to be cut and shaped it on a cutting board. That way I wouldn’t mark the white icing or cut into the cake by accident. I used a damp sponge to make the icing stick in place.

Add any sleeve details and badges or logos to the front of the shirt. You don’t have to copy the real shirt exactly. The colour of a shirt is a big giveaway so making it personal with the age as the number on the shirt and the name on the front always seems to go down well.

Cut a narrow strip and create a neck on the shirt.

I cut out the numbers and names from thin icing sugar or floral paste with cutters and let them dry for 1o minutes so that they are easier to handle and don’t loose their shape. If the icing gets stuck inside the cutters rub a little icing sugar inside. If there is a really difficult number/letter I usually cut it twice in one go. That way I can press them both out at the same time with a dry paint brush and only the top shape is damaged and dented, leaving the one on the bottom in perfect shape!

Position the name and age/team number on the front with either a damp sponge or with edible glue

To make the scarf I make the stripes and roll them flat so they stick together. For the tassels cut a small square of icing the same width as the scarf. Use a sharp knife to cut lines in the square from a few mm from the top. Lift up as you cut each strand as this makes the tassels look like they have been ruffled. Position each tassle underneath the end of the scarf.

How to make a football shirt

Use a small amount of royal icing to secure the scarf to the cake.

And there you have it. A football shirt cake.

Enjoy!

Related Posts Plugin for WordPress, Blogger...
[instagram-feed]