How NOT to make a mermaid cake
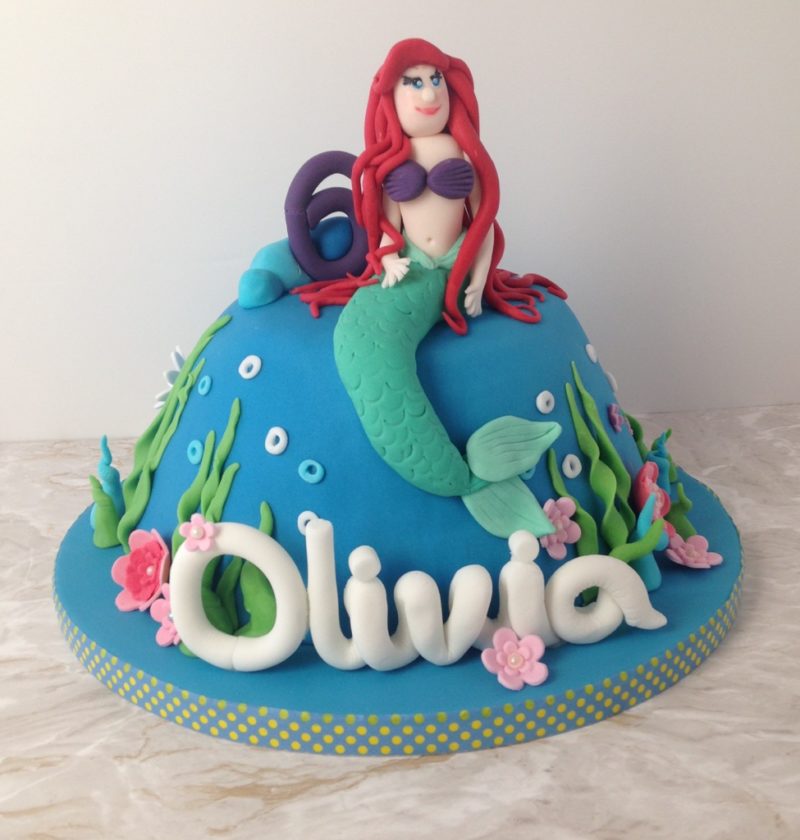
Sometimes my cakes go wrong and when I say wrong I mean REALLY wrong. I didn’t realise quite how wrong this cake went until I had finished it. Tim -my harshest critic, walked into the kitchen and I asked “What do you think?” his response after looking at the mermaid was …
“Well, he doesn’t look very happy does he!”
He !!! He !!. Well I guess Tim did have a point. I had given HER the most enormous chest. Not quite sure what I was thinking about whilst making this mermaid for a 6 year old! And to make matters worse this was a cake for Free Cakes For Kids. I managed to squish the head a ‘little’ when I was adding it onto the body (without a neck) and then even further still when I attached the strands of long, heavy, sugarpaste hair. Her beautiful oval shaped head kind of became square and rugged looking. But I didn’t notice at the time. I was too busy concentrating on making the hair stick to her head.
The right way to decorate the cake
I was really happy with the rest of the cake. I baked an 8″ Madeira cake and filled half a Christmas pudding bowl tin with cake mix to get the curved top. I used the ingredients for a 9″ cake and split the mixture accordingly.
I buttercreamed the cakes together – cutting the 8″ in half. I then did a crumb coat and covered the cake in blue sugarpaste. I really like the sea like decorations. The twists were made when I covered the cake board in sugarpaste. I just rolled out different sized cones and twisted the tops then left them to dry out. The same effect was used with the seaweed but the green strips were long and thin and were twisted and stuck to the cake straight away. I like how it gives the base of the cake a 3d effect.
For the air bubbles I rolled tiny little balls of sugarpaste and used a balling tool to make a hole in the centre. They were then stuck on by making the back damp.
The flowers were made in advance too but just a day before. They were set in painters pallettes so they would dry curved.
The cake toppings
Seriously! What was I thinking with those knockers!!!! I can’t believe I thought that looked appropriate for a six year old!!! Anyway, as well as the well boosomed mermaid with the chiselled jaw, I made a number ‘6’ from a roll of sugarpaste which was left to dry for ages – like a week. I also made the name in the same way for the front of the cake.The ‘6’ had rocks placed behind to hold it up and in place.

If you really want to know how I made the mermaid this is how!
The mermaid’s tail was added to the cake first then the body. A ‘belt’ was added around the join. The tail and belt were marked with a half moon cake decorating tool. The arms were added and the painted head was attached. Finally the hair was stuck onto the mermaid using royal icing.
I had such great intentions and aspirations for this cake but I felt it fell flat. The little girl who it was for loved it – but let’s face it – she was six, it was a mermaid and it was cake. What’s not to love in her little world? Next time Free Cakes For Kids I promise I’ll do better! Maybe you should give me a man to make from sugarpaste. I think I’ve got that down pat!
All kidding aside – this was another cake for an amazing charity. The recipients are always so grateful to receive a cake for their little ones and it’s an absolute pleasure to be able to give back to our community in that way.
So, have you had a cake that’s gone wrong or just not to plan? I’d love to know all about it and see the cake wreck love. Feel free to share your cakes on the CakesBakesAndCookies Facebook page. It’s good to share.
EmmaMT x

More Cakes you may like
Sleeping Beauty Birthday cake for FCFK
Apple Strudel recipe for Succot
Christmas Jam recipe: The perfect gift
Flipping Nora, it’s pancake day tomorrow!
How NOT to make a mermaid cake

