My first ever cake demonstration- for Create and Craft

Last Sunday I did something I’ve never done before. I stepped outside of my comfort zone and I did a cake decorating workshop at the Women’s Institute Centennial Fair in Harrogate for Create and Craft
I’ve been styling photo shoots for Prima’s craft pages for a few months now and they have teamed up with Create and Craft to produce a bumper Christmas craft magazine. That’s how I got involved. Create and Craft asked Prima if someone from the team would like to do a demonstration. I offered up my services saying that I can do most crafts except knitting and crochet – and felting. I mentioned that I had this blog and they jumped at the cake decorating idea and showing how to make sugarpaste roses.
I’ve done workshops before but they’ve always been in my kitchen and for around six people. This was in a proper demonstration theatre with a stage and microphone (up my top!) and for the WI !!!
I made the cakes in advance then put them in cake boxes. I then put those boxes inside bigger boxes with bubble wrap all around them. Placed them in massive bags and stuck a massive travellers rucksack on my back – full of cake decorating equipment and had one cake bag in each hand and off I went to Kings Cross Station. You should have seen me. I was a very wide load- avoiding every knock and budge from other travellers which isn’t easy when you have to travel in a car, train, tube and then a three hour high speed train and a taxi at the other end to get to the hotel! I made it in one piece and didn’t dare unwrap the cakes till I got to the fair the next day. The cakes were all intact. I don’t know how!
I went on at 1.15pm. I don’t know how I did as it was all a blurr. I think I spoke too fast and I definitely rabbitted on and on while I made the repetitive petals for the roses but I had a pretty good audience and everyone seemed to be smiling at me at the end. The WI ladies I spoke to throughtout the day were so lovely. It was a really great atmosphere and I did spend a whole load of money!
The Create and Craft team were all really lovely and made me feel right at home from the very beginning- thanks you guys.
The demonstration was on how to make three types of roses. Here’s what I demonstrated.
Enjoy!
Rose buds

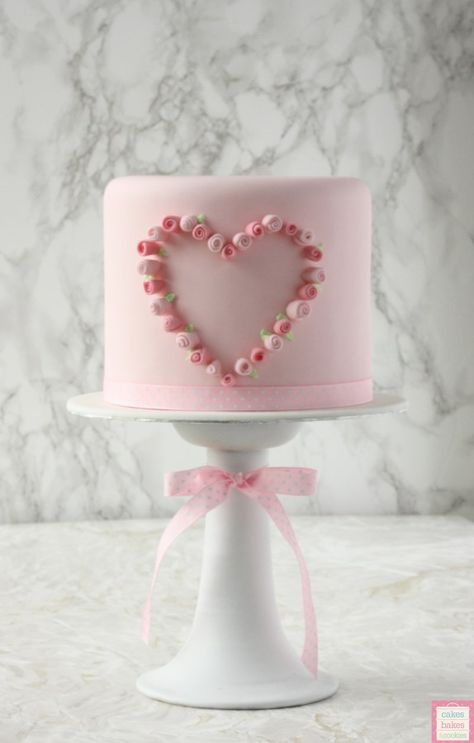
These are some of the easiest roses you can make for a cake. They work well with sugarpaste but if you use florist’s paste they will be much easier to handle and will firm up much quicker. As with most decorations these roses work best in odd numbers. I think groups of three’s look best but five, seven and at a push even nine can look great grouped in a corner of a cake. As they are so small there is plenty of scope for designing a pattern with these tiny roses – be that an initial, a number for an age or a heart as I have done here. In the past I’ve also used these rolled roses to fill in gaps on wedding cakes when the cake is filled with bigger garden roses. Simplicity rules – especially with cake design. Don’t you think?
To make rolled roses.
If you want all your roses to be the same size you can roll out your sugarpaste and use a small circle cutter to cut out the number of roses you need. When you roll these discs of sugarpaste into balls and then into roses they will all be the same size. I don’t mind them being slightly different. The choice is yours.
- Take your ball of sugarpaste and roll the ball into a sausage then flatten it.
- Roll your flattened sausage from the smallest end. Don’t squeeze it too tight and if it doesn’t naturally stick at the end add a dab of edible glue. Try and make the last end narrower so it finishes nice and neatly.
- Set aside to dry and repeat with the rest of the sugarpaste balls.
- If your roses all look too different in height you can cut off some of the bottom once they are dry to even them up a bit.
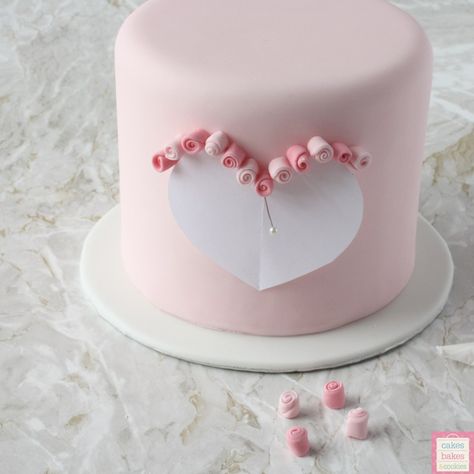
- To stick the roses onto the cake use a little royal icing. Hold the rose against the cake if adhering to the side for a few seconds. If too much royal icing squidges out at the sides clean it up straight away with a dry paint brush.
- To make the leaves: colour some royal icing green and place it in a piping bag. Snip off a small ‘V’ at the bottom and start to pipe a tiny amount of green icing near the base of a rose and lift away and stop pressing the piping bag to create a triangular leaf shape. Add as many leaves as you think necessary. Leave to dry
- If you are worried about adding the roses freehand you can score the sugarpaste in your design and then follow the line. You can also make a paper template as you can see I did with the heart, which you can pin in place and remove at the last minute. It also helps you to know how many roses you’ll need.
Brooch roses
I’ve been making these brooches for cakes and cookies for ages. They’re a great way to add a touch of shimmer to a celebration. You can get pearls in all sorts of colours now so keeping to a colour theme for a party or wedding couldn’t be easier. I used Wilton’s dark grey, pearl, pink pearl and silver but the world is literally your oyster!
To make the booches
- Roll out your florists paste (or sugarpaste) to around the thickness of a £1 coin. Brush a little edible glue over a small area. Add one colour pearl to the centre then add an alternative colour balls all around the centre. Press down lightly with your finger so the pearl balls sink in a little.
- Use a circle cutter to cut out the shape. I made really small ones so I used the end of a piping nozzle to cut out my small brooches. I didn’t have small enough circle cutters as I wanted there to be little or no florists paste showing outside of the pearls. Set these aside to firm up – overnight is best.
To make the roses
- Roll out your florist’s paste so it’s reasonably thin then cut out large rose shapes. You can pretty much use any flower shape with this design as you are going to layer up so the more the merrier
- Place the cut out rose shapes into an artist’s palette (reserved just for decorating)
- Cut out more roses in smaller shapes and different colours. Use a dab of edible glue to stick each rose to the one underneath it. Keep adding till you have enough roses.
- Use edible glue to stick the brooches into the centre. Leave to dry overnight before removing. It’s a good idea to lightly dust the pallette before adding the roses so they don’t get stuck. Also if you have time, remove the roses from the pallette and upturn them onto a piece of florists foam so the underneath can dry fully before you stick them on the cake.
- To stick the brooch roses onto the cake use a little royal icing and hold them in place for a few seconds if adhering them to the sides of the cake.
- Position your ribbon on the cake before you stick the roses on as you can overlap the ribbon with the roses (still sticking in place with royal icing).
I love making these rosettes ever since I got my hands on these Wilton cutters from Create and Craft. They have two sides – circles and crinkly circles. The crinkles are really small and make pretty designs so these rosettes look super cute.
If truth be told I wanted to make these for the roses for my workshop at the Create and Craft theatre but Tim (my husband) took one look at them and said “I thought you were making roses?” to which I replied “They’re modern roses!” He gave me one of those looks that says “Really Emma?” and so I set about making the brooch roses instead. But never being one to waste an idea I stuck the rosettes on the back of the cake so I could still share the design. Which do you prefer?
To make Rosettes
- Roll out two or three colours of sugarpaste. I chose three pinks which were close in colour. Try and keep them to similar thicknesses.
- Cut out an outer crinkly circle then keep cutting smaller ones.
- Once you have lots of different sizes in different colours mix and match them so they are all flat and neat.
- Cut out a centre circle and place a brooch the same size as the hole made from pearl balls in the space.
- Cut out a crinkly circle which is just bigger than the mixed design. Brush it lightly with edible glue. Carefully lift the design with the brooch onto the larger circle and press lightly with the ball of your hand to adhere the two pieces together. Leave to dry.
- If you want the design to stick to a round cake only leave the design to dry for 20 minutes before adhering it in place on the cake with royal icing. That way you can gently encourage the rosette to bend with the curve of the cake.
Garden rose cupcakes
These are one of the most requested roses when it comes to wedding cakes and they are also the most time consuming. If you are planning to make them for a wedding cake start them straight away. As soon as you get the request. Not only do they take an age to make but they will be so much easier to handle once they are completely dry. Even once they are dry they are really frail so always handle them with care.
I love to put these on cupcakes. They make them look really glamourous. Almost too good to eat!
How to make Garden roses
The trick with these roses is to make them a little crinkly. Real roses are never completely smooth so a curve or two will only make them look more real like.
- Always use Florist’s paste when making these roses. You can roll it out really thin without it tearing – which sugarpaste will definitely do. Florist’s paste will dry out really quickly so always keep any paste not being used wrapped up and in a sealed sandwich bag.
- Edible glue is used throughout this rose to stick petals on.
- Make small buds from florists paste and leave to harden for a few hours.
- Roll out the florists paste so that it’s paper thin and you can almost see the design of your roll out mat through it.
- Cut out one large petal. Stick it to the rose bud so that it covers the entire thing and overlaps at the top. Keep the petal to a point and tuck inone edge of the petal. Leave to dry.
- Roll out some florists paste and cut out three small petals. Take each petal in turn and any not being used should be stored in a plastic sleeve (the kind you use for paper) so that they don’t dry out.
- Place the petal on the firm foam and use a cell pin (rolling pin with a curved end) to thin it out more. Work in a circluar action thinning out the centre and then concentrating on the edges so they are the thinnest part of the petal. They will start to frill when they are thin enough.
- These first three petals are going to be positioned tight against the bud. Start by adding the first petal. The centre of the petal should line up against the join line of the very first petal on the bud. Stick the petal on firmly and gently pull back the very top of the petal so you can just see the bud. Repeat with the next two petals – again positioning the centre of each on the join of the last petal added.
- The next layer has five medium petals. Cut out these thin petals and thin them out with the cell pin on the foam as previously done.
- To give the petal shape pinch the bottom of each petal.
- Take the very top edge of the petal and fold it over a cocktail stick. Slide the cocktail stick out so the fold in the petal stays in place. Be very careful not to break it off. Repeat on both sides near the top. Place the petal to one side to dry for twenty minutes. You can dry petals quicker on a piece of foam.
- Continue to thin and fold the other petals.
- Once all the petals have been made and are dryer they will hold their shape. Stick them onto the rose bud. Apply glue in a ‘v’ shape at the bottom of the each petal and stick down the right hand side of the first petal. Before you stick the left hand side down position the next petal- overlapping the last. Each petal overlaps the next. The folds you created with the cocktail stick force the petals into place and make the overall rose bigger. Leave to dry over night. The rose will be difficult to handle at this stage if it’s not left to dry.
- Once dry cut out seven large petals and thin them in the same way. Then pinch at the bottom and fold over the edges with a cocktail stick as with the last layer.
- Add these rose petals in the same way – overlapping as you go. This is the last layer so let them open the rose up.
- Once each petal has been stuck on the final layer leave the rose upturned on a piece of foam to dry thoroughly overnight.
- To stick the finished garden rose on a cupcake turn it over and with a very sharp knife remove the stem at the bottom of the bloom. Keep in mind if you want to travel with these cupcakes they will need to fit in the box with the lid closed so they need to be quite shallow.
- Pipe a buttercream swirl on each cupcake then position the rose on top. Leave to set for 30 minutes before travelling with them.
Wow! That was a long post! I hope you enjoyed it as much as I enjoyed the demonstration. All that’s left to say is thank you to Create and Craft and Prima Magazine for such an exciting opportunity.


They are beautiful – seems a shame to eat them! But I’m game to give it a go!! Cx
Yeah, I’d agree if the two big ones weren’t made of polystyrene! The cupcakes were real though and I had a good go at them! xx
p.s. Great class this morning. I felt the need for an afternoon nap!
Emma this a fantastic post, well done you. I’m definitely going to refer to your advice in the future. xx