There is a good reason I should stick to baking cakes and not go anywhere near bread. It just doesn’t work for me! I mean I love the texture of a bread dough as it’s soooo soft and malleable compared to what I am used to kneading – cold hard sugarpaste! But as a blogger you sometimes get invited to these fab events and last week I was lucky enough to be asked to attend the Brioche Pasquier brioche masterclass in Greenwich where myself and 10 other bloggers were to be taught how to make brioche the traditional way. No problem I thought.
The event
The day started off really well and we all donned our aprons and listened to the grandson of the Monsieur Pasquier (the baker who started it all off in France in 1936) explain how the bakery was the first to make brioche with levain (a type of sour dough) to give their products that amazing taste which is still used to this day. It’s a secret formula so we made traditional brioche using dried yeast instead of live yeast. The difference? Well, our workshop was three hours long including lunch. To make them in the factory the old school way takes 5-6 hours!
The lovely Christine showed us the steps how to make the brioche. It should have been easy. She made it look easy. It is not easy. Well not for me anyway!
I followed her instructions and measured everything carefully, starting with the flour then adding the salt and half of the sugar to one side of the bowl and the yeast to the other (the yeast reacts with the salt so you don’t want them getting up close and personal until you’re ready to mix it all up). You then add the butter and eggs and the water. You’re supposed to mix the ingredients for a couple of minutes to incorporate it all together then set it to run faster for a further 5 minutes before you add the rest of the sugar.
This is what mine looked like! It was supposed to be smooth and bouncy and ready to be rolled out. NOT sticky and gloopy and dry and crumbly all at the same time! Yuck! Christine came over and suggested a solution. ‘More water’ so we added more water. No change. So we added more. Still no change. I could see that she wanted to say ‘there is no way this is going to work” but she was far too sweet for that.So I said it. “Shall I start again from scratch?” I asked. There was a resounding “Yes” from all the Brioche Pasquier team. By this point everyone else was rolling out their brioche rolls ready for proving.
So I started again with bowls of pre-weighed flour, sugar and salt being sent in my direction at speed. I don’t think they trusted me to weigh it myself- probably best! I started the mixer up and let’s just say that it isn’t one I’m used to. The K-Mix has a reverse so when I started it up and it went too fast so I quickly twisted the speed dial back in the other direction and sent the dough hook whizzing backwards just as fast! Flour, salt and yeast went everywhere! Once I got a handle on how to use it the ingredients started to form a dough. A sticky, yucky dough AGAIN! What was I doing wrong!?! I should also mention that the K-Mix wasn’t too happy and started giggling across the work surface.
As it turned out with the first batch I measured the wrong amount of water. This time I had mixed it all up too quickly at first. Christine to the rescue again!
I needed more water in my dough and more mixing to make it form a smooth stretchy dough. Every couple of minutes one of ‘Team Pasquier” would come over to see how I was doing- as all the other blogger’s rolls were about ready to go into the oven and I hadn’t even started rolling out yet!
More water and more mixing then Christine grabbed a small amount of my dough and pulled it between her fingers to see how stretchy it was. It tore each time. More water and more mixing and then it had to go in the oven or we were going to run out of time.
This is how it looked. Still a bit dry according to Christine but it would taste just fine.
All hands on deck for the rolling which you do with the heel of your hand pushing against the work surface. As my dough was so dry it didn’t really stick as it should have done. I did my best and I need to say an extra big thank you to Solange Brechemin from the Pebble Soup blog who came to my rescue and helped me, Christine and Olivier to roll them out in double-quick time. My efforts had lines and dimples. Christine’s, as you would expect, were perfect! I then gave them a generous brush with water to stop them cracking while they proved.
To speed the process up the rolls were popped into a proving oven and they looked pretty fab when they came out. You then have to give them a generous wash of egg and scatter sugar pearls over the tops before you bake them for just 10 minutes.
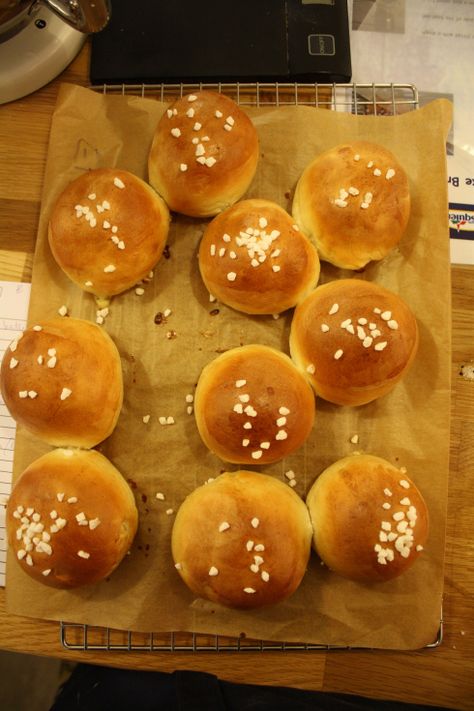
And just look how they turned out! After all that adding water and extra mixing they looked absolutely perfect. “Yes, but how did they taste I hear you ask?” Well let’s just say that the proof is in the pudding. When I asked Tim if he had tried any of my brioche brought home from the event and if they were good he looked at me like I was mad and said “I’ve had 5!” So that was a big yes. But the really test was the girls. They absolutely loved them.
So, I had a really fantastic day, a great laugh with the Brioche Pasquier team who were very gracious in my nightmare and so, so lovely that now this cake baker can’t wait to have another go at baking brioche the Brioche Pasquier way. I truly believe that by my dough going so wrong I had the edge over the other bloggers. Sometimes learning from your failures teaches you how not to do something and gives you spectacular end results next time.
If you fancy making your own brioche the recipe we used is below, but for the real deal you can buy the Brioche Pasquier range at supermarkets. I have to say that Beau and Darcey completely love the individually wrapped Pitch chocolate and jam filled brioche for their packed lunches but for me it’s got to be a traditional Brioche all the way!
EmmaMT
p.s. Brioche Pasquier have some really deelish recipes on their website too!
Brioche Pasquier traditonal Briochettes recipe
- 500g Strong flour
- 100g water
- 3 eggs
- 125g unslated butter
- 120g caster sugar
- 40g bread yeast
- 10g table salt
- 1 egg and milk for the egg wash
- optional extras: chocolate chips, sugar pearls
- Put the flour in the mixing bowl and attach the dough hook
- Add the salt and half the sugar to one side of the bowl and the yeast to the other.
- Add the water, eggs and butter and mix on a SLOW speed for two minutes then on a MEDIUM speed for 5 minutes
- Add the rest of the sugar and mix for another 4 minutes. The dough should be soft and shiny and elastic!
- Now is when you can add chocolate chips if you want.
- Divide the dough into pieces of 50g and shape into smooth balls.
- Very lightly brush the dough with water to avoid the brioche from drying out.
- Leave in a warm place for about 1½ hours to prove
- Preheat your oven to 200ºC.
- Brush the brioche with the egg and milk wash and sprinkle sugar pearls on top.
- Bake for 10 minutes. Leave to cool before serving.
More Chocolate Recipes you may enjoy
How to cover a cake in chocolate ganache
Baking brioche with the experts ‘Brioche Pasquier’
How To Make The Very Best Vegan Chocolate Cake You’ll Ever Bake
Chocolate cupcakes recipe with cherry goodness
Fast from the freezer Double Chocolate Chip Cookie Recipe
Some seriously chocolatey cookies
Chocolate peanut cookie recipe
Easy peasy White Chocolate cheesecake


[…] compared with cakes, but after attempting a few from his book and having a lot of fun/mishaps when making brioche recently I am now more keen than ever. I love the way Paul explains everything in such easy to […]