Easy butterfly cookies

I made these butterfly cookies for a local charity event a few months ago. As a volunteer at Free Cakes For Kids we’re always being asked to support local charities and this time it was for The Maypole project. Oh I do love a charity bake, don’t you?
I’ve baked a few cakes in the past for The Maypole project charity but this time it was for a summer fete where they were going to be selling bakes to raise funds. I thought 20 odd cookies would make some money so I set about making the biscuits a few days before.
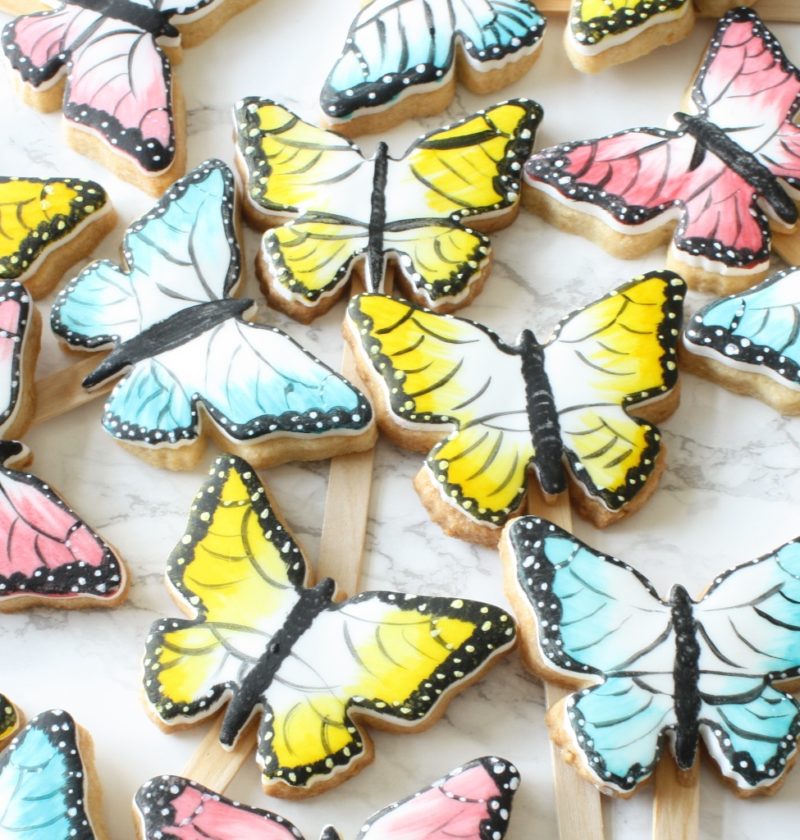
I’d been looking for an opportunity to make butterfly cookies on lollipop sticks for ages. They always looked a bit daunting so I set about decorating them slowly. I painted one stage at a time on all the biscuits so they had time to dry in-between layers and I was really happy with the end result. They looked pretty good on their own but it was when I put them all together that they looked really great.
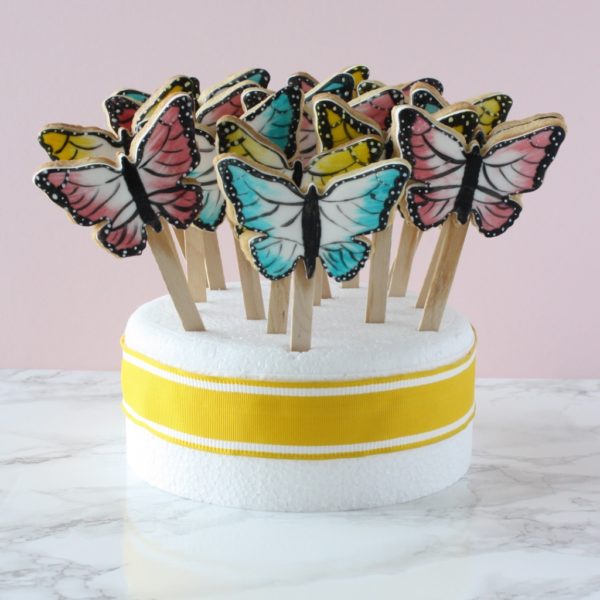
Displaying the cookies
I used a fake cake made from polystyrene to hold all the biscuits. First I pushed a spare lollipop stick all over the base so the actual biscuits would go in -facing the front, with little need for pushing.
Once they were all in place I wrapped a thick piece of ribbon around the fake cake and wrapped the lot in cellophane. I then insisted on Tim driving us to the fete so I could hold them on my lap for the journey. I didn’t trust them to stay upright anywhere else for the journey.
I dropped them off at The Maypole Project table then we had a look around the rest of the fete. It’s hard not to resist going back and having a peek to see if your baked goods are selling throughout the afternoon. I only looked twice and they seemed to go down pretty well.
So now it’s your turn. They’re easy to do. Why don’t you have a go?
Easy butterfly cookies
(Makes around 20 biscuits)
- 200g unsalted butter- at room temperature
- 200g caster sugar
- 400g plain flour
- 1 egg (medium) – at room temperature
- 1 tsp vanilla extract
- White sugar paste
- food gel colours
To make the cookies
- Place the butter in a bowl. Add the sugar, flour, egg and vanilla essence.
- Mix all the ingredients by hand. I always mix biscuits by hand as the warmth from your hands means that it’s all being blended really well and for some reason they taste much better than when mixed with a machine. You can always start the mixing with a wooden spoon if you don’t like gloopy hands.
- Be careful not to over mix biscuit dough. It will not only become tough, but the biscuits will spread more when baked and we want them to keep their shape perfectly.
- Once it is nearly all blended I turn the dough out onto the worktop and knead it till it all holds together nicely.
- Wrap the dough in cling film and pop it in the fridge for at least 30 minutes. This allows the gluten in the flour to do it’s stuff. Without chilling the cookie shapes will definitely contort when baked.
- Remove from the fridge and knead a little on a lightly floured surface. Roll out using spacing sticks to ensure that your biscuits are all the same thickness.
- Cut out the cookies then remove the excess first. This way you can pick up the biscuit without denting it.
- Place a lolipop stick in each cookie making sure you don’t poke it through the front. It’s okay if it pokes through the back as the baking will keep it in place.
- Place on a baking tray lined with silicon paper and pop them back in the fridge for another 30 minutes. This ensures the cookies bake slowly and don’t spread. It’s the easiest way to make sure each design is exactly the same.
- Pre-heat your oven to 160°C then bake for 12 minutes or until the biscuits start to brown on the edges
- Remove from the oven and leave to cool completely on a wire rack. Avoid handling the cookies till they are cool. If you pick up a hot cookie by the lollipop stick it’s likely to fall out!
To decorate the cookies
- Roll out the white sugar paste so it is nice and thin then use the same butterfly cutter to cut the shape. Carefully pick up the sugar paste butterfly and dampen it on the reverse then ‘stick’ it down onto the butterfly cookie. Smooth it onto the cookie with the palm of your hand. Smooth the edges so they don’t stick out – or the sugar paste will snap off.
- Use a little yellow food gel colour – watered down with clear alcohol, to paint the edges of the wings
- Continue till half the wings are painted
- Use a dark brown or black colour to paint the centre of the butterfly
- Use jagged brush strokes for the tips of the wings
- Paint a thin line around the rest of the wings
- Paint across the lower wings and give the tips some detail
- Draw veins across the top wings
- and the bottom
- Make shiny white paint with a white lustre powder and some clear alcohol and paint tiny dots all around the outside edge of the wings on the black area.
- Leave to dry overnight.
enjoy!
EmmaMT x
More Cake Decorating Posts you may enjoy
How to cover a cake in chocolate ganache
Buttercream Recipe for Different Size Cakes
What size eggs should I use for baking?
How to make a Mario and Yoshie Birthday Cake
How much sugar paste do I need ?


omg!! miss LG will absolutely swoon over these!!!
Emma, these are so beautiful. Thank you for sharing your technique- and for supporting such a worthwhile charity.
wow, they look amazing. I like the shading of the colour. You are just so very talented!
These look really pretty! You’ve really got skill. I very much doubt I could reproduce such pretty butterflies.
I’m sure you could. I’ve seen your bakes!!!
Emma, these butterfly cookies are incredible. Seriously amazing! I have pinned the images and will share on Facebook and Twitter. You are a really talented lady, baking for a charity too. xx
How long will these gorgeous creations last please?????
I’m intending to make some for my granddaughters first birthday party in pastel colours,
but have so much to do , it would be great if i can do them in advance!!!
thank you!
Hello there,
These are great for making in advance. I’ve made them (the ingredients – not the butterfly design!) for Christmas in the past and made them three weeks before they were needed. As long as they’re in an airtight container they taste as good as freshly baked the day before. This makes them great to bake and post as a gift too.
EmmaMT