
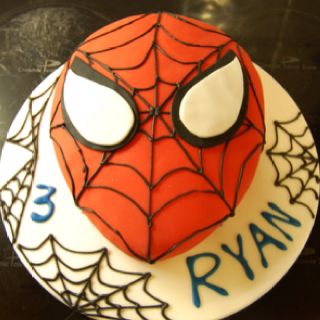
Power Ranger Birthday Cake

I recently had a request from a reader called Laurie, asking me how I made this Power Ranger cake which she saw on my ‘More cakes’ page. This is another early cake which I can’t believe I did two years ago! It feels like yesterday. George was at nursery (and now school) with Beau and Sammie is a year older than Darcey, so they were also at nursery together too.
The boys were both really into Power Rangers at the time and I thought the easiest way to do this theme was with a head shape. I made a round Madeira cake and cut the top off so it was more helmet shaped. The whole cake was covered in a thin layer of white sugar paste icing. Then it was covered in a second layer of blue icing. I made templates from paper for the eyes, mouth and the badge detail on the top of the helmet.
The Mouth
I wanted the cake to look as 3D as possible. I positioned the mouth template over the base of the cake and cut away and removed the first layer of blue icing, leaving the white icing underneath in place. I then used white icing to create the lips, attaching them with a damp paintbrush. I painted the whole mouth and lips in edible silver paint (you can buy it on Amazon here) and let it dry. Edible metallic paints are best used with alcohol whether painting or cleaning the paint brushes. I learnt this the hard way and had to throw out a few brushes as the bristles just clump together if you use water.
The eyes
I cut out the double layer eye masks from the templates, making the black one a little smaller than the white. I then positioned them on the cake. For the helmet badge at the top I placed two rectangles on the badge shape then used a larger cutter to imprint rectangles onto it, giving it more detail. I then painted it in silver edible paint and left it to dry before I secured it to the cake with a little Royal icing. I cut the ‘V’ shape for the helmet out of black icing and secured that with royal icing too.
The cake board
I always try and make my cake boards look extra special or as detailed as possible, so for this cake I cut out the two names nice and big in a bold red colour, then I cut out different sized stars, some with an extra star cut out. I used a pale blue sugar paste icing to cover the whole board so it could create a cute backdrop.
In all I think this cake works well as it’s a simple design, the colors stand out and the board gives it that little something extra. What do you think?
EmmaMT
More Recipes you will like
How to make your own butterHow to make Pumpkin Cake Pops
Joint 70th Birthday Bunting cake
thank you so much for replying to my email! I am going to try and do this with your instructions. Wish me luck!
Good luck. I’m sure your cake will be brilliant!
EmmaMT
X