


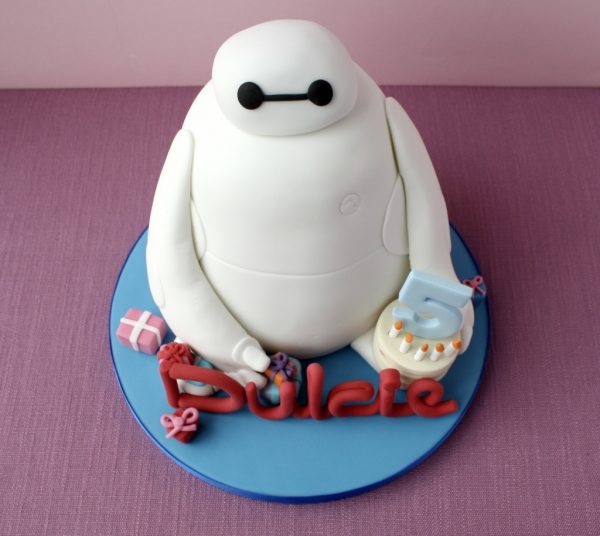
Last month I was asked to make Dulcie’s 5th Birthday cake and it wasn’t a Baymax birthday cake. In fact I feel a bit guilty that my first response when asked was ‘Oh no, not another Minecraft cake with hundreds and hundreds of little green squares!” Dulcie’s mum very graciously changed her mind to a Baymax cake and I was soooo pleased. Not only that it wasn’t a Minecraft one but because we loved Big Hero 6 and I knew Baymax was going to be a fun one to do.
The challenge was to make him a bit interesting and not just a big white figure on a cake board. Dulcie’s mum said “No pink”. It sounds like Dulcie is like Darcey – properly feminine and a complete tomboy at the same time. She also asked for the cake to be blue. “No problem” I said. And then I tried to make it!
The impossible blue Baymax birthday cake !
I set off on a google research mission. I’ve coloured my madeira cake before but never a specific blue colour and I know from the past that a yellowy, cream cake mix will not make a blue cake. It will be green! I even asked at the cake decorating shop how to do it. They weren’t sure so we looked for a ‘white’ cake to bake that could be coloured on line. The cake on the blog we found was as pure as snow. The author had removed egg yolks and replaced them with buttermilk. She used white butter- which we can’t get here (if you know of any please let me know) and it looked light and fluffy. I tried. It was not pretty! The cake was very light in colour but no where near white enough. I added the blue colouring and baked it. It came out illuminous turquoise. Not good. It also went completely solid after one day, even though it was double wrapped in cling film. Yuck!
For the next trial I baked my madeira cake, removing the egg yolks – replacing them with double cream, I used sunflower oil instead of the very yellow margarine and I used President butter – the whitest butter I know of. It still came out deep green but it was marvelously flat and very soft. In the end- running out of time, I had to see if a green cake would be okay and when Dulcie’s mum said “Go for it” I made another batch of my madeira cake – again making it as light in colour as possible and only adding a touch of blue colour and the end result was lovely. Pfew!
How to make a Baymax Birthday Cake
This cake was relatively straight forward to make. As long as you have enough cakes to stack you’re good to go. Cover the cake board a few days in advance so it has time to harden.
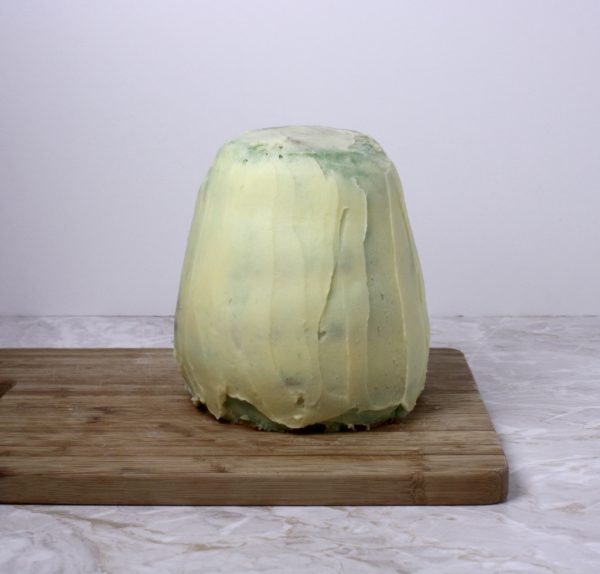
I used a number of tins with paper liners in them as I didn’t have enough of the same size to get the height. The paper cases were for 7″ cakes. I made 3 x 7″, 1 x 6″, 1 x christmas pudding bowl – for the curved shoulders and one 4″ cake for the head. I used my 9″ Madeira cake mix and split the cake mix between the tins.

As the cakes were so uneven I flattened off the tops and stacked the cake to see how it would look. Once I was happy I added buttercream between each cake and smoothed the shape of the body. To make the cake secure and prevent the layers slipping off one another I pushed three wooden skewers into the body and snipped the ends off.
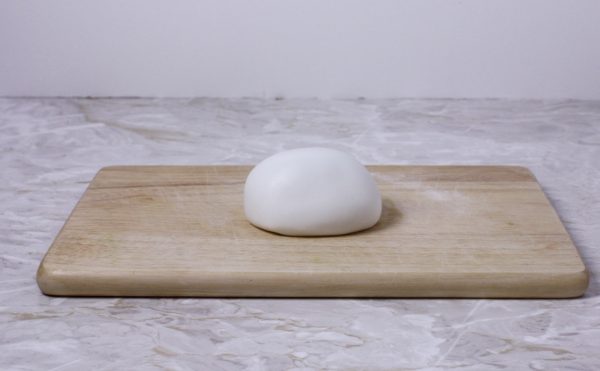
The head was a small 4″ cake. Use a sharp bread knife to shape it into a head shape then cover in buttercream and then cover with sugarpaste. I made the head first so it could harden up a little for when I needed to handle it into place later.
Once cut to shape cover the body in a crumb coating of buttercream. Place it in the fridge to set for 10-15 minutes. I had to remove a shelf to fit him in. Then add a second coat of buttercream to get a smooth surface for the sugarpaste to sit on. I like to chill the second coat for another ten minutes but it’s not essential.
Roll out the sugarpaste quite thick – around the depth of two £1 coins. I covered the body in one go so as I lifted the sugarpaste off the work surface I knew it would stretch and likely tear if it wasn’t thick enough. As it’s positioned it does get thinner. To make sure there are no creases lift the sugarpaste at the bottom up and gently lift it away from the cake with one hand while smoothing it down with the other. This action will stretch the sugarpaste into shape and prevent creases. This does take some practice but just take it slow and don’t be afraid to pull the sugarpaste away furhter than feels right. Tuck the paste right into the base of the cake and remove any excess. I was able to lift the cake up and tuck the sugarpaste underneath then place Baymax onto the cake board (with royal icing to make him stay in place). I then rubbed down where my hand was to make him smooth again.
Use a drop of royal icing to position the head in place.
The arms and legs were made from sugarpaste. Roll out sausage shapes then make them gently squared off at the ends. On the legs use a palette knife to make groves where the feet are and on the arms cut an additional oval for the elbows. Both the arms and legs were stuck into position with royal icing. The arms need to be held for a minute till they stick and won’t slide off. Once the arms were secured four fat sausage fingers and thumbs were added.
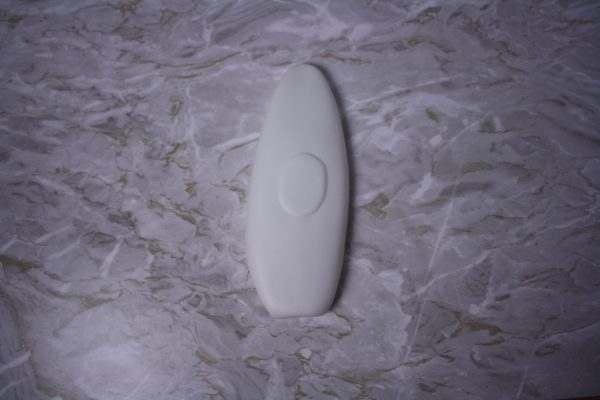
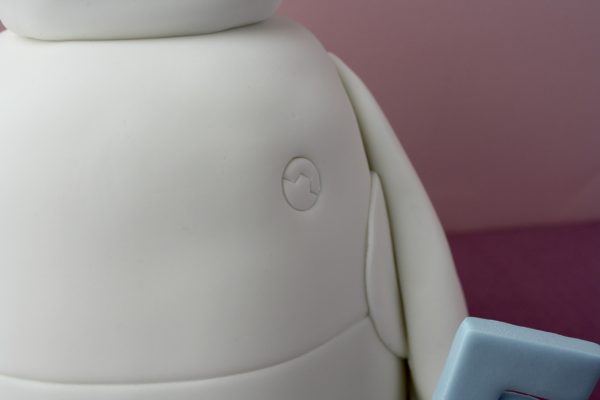
The badge on Baymax’s chest was made with a circle cutter. A palette knife was then used to make the detail lines in the centre.
For the face be really careful to position the eyes- cut out from black sugarpaste and a line of sugarpaste, exactly where you want them to be. Black sugarpaste is really sticky and once it’s on you won’t get the marks off. Luckily Baymax’s face is really simple. I used edible glue to position them so there was no chance of seepage.
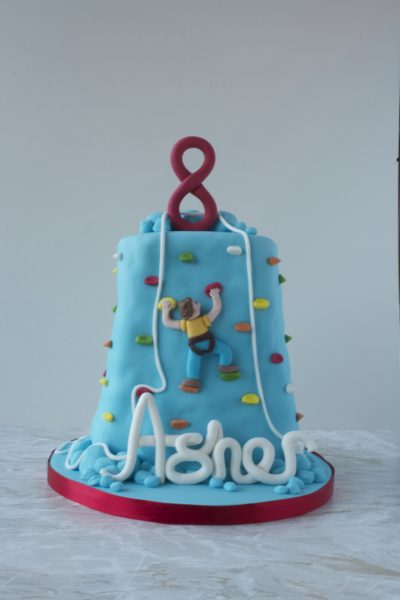
I really love writing names in sugarpaste since I made Asher’s climbing wall cake . Again, I wrote the name out in a big black marker on paper and placed silicon paper over the top then traced the letters in a long thin line of rolled out sugarpaste. I then left the name to dry. Drying a name takes around 4-5 days but you can speed the process up by placing it in a warm (not hot or it will melt) oven. I put my oven on to 50ºC for five minutes then I turn it off and place the name inside for only 10 minutes. Remove it and leave it to cool completely. Repeat if you want the name firmer. The firmer the name the easier it is to handle and the less likely it is to break. Use Royal icing under and behind the name to stick it in place.
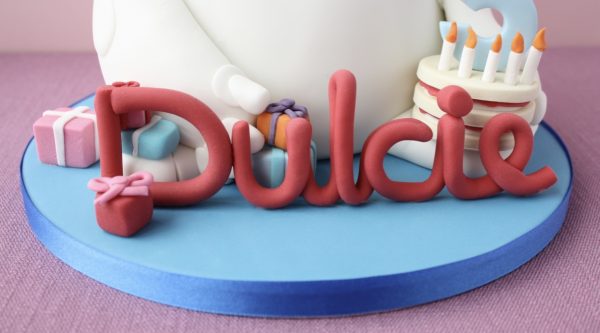
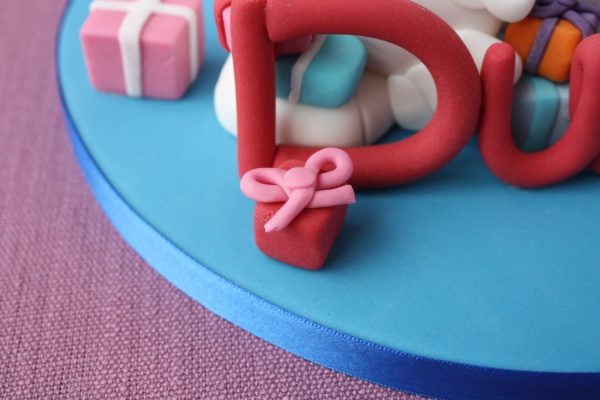
As the cake was going to be pretty bland with just Baymax I made little cubes of sugarpaste into wrapped gifts by adding ribbons and bows on top. They were placed around Baymax. I also didn’t just want to have a number 5 any where so I made a mini birthday cake complete with five candles for the number to sit on. I did this with thick sugarpaste cut out into circles in beige and then had smaller white discs (for cream) with red ‘jam’ over the top. These were layered up together with royal icing to hold them together. If I was to change anything about this cake it would be to make the sponge layers of this mini cake more brown. Next time! The candles were thin florists paste (as it dries harder quicker) with sugarpaste flames on top. I used red and orange sugarpaste which wasn’t completely blended together to make the flames more interesting.
So, that was it. I really loved making this Baymax birthday cake. I think it works for boys or girls, you just change the colours to suit. What do you think?
EmmaMT
x
More blogs you may enjoy
Evie’s Easy Minecraft Birthday cake
Kitchen Gadgets Review: Russell Hobbs Aura 6 in 1 hand held blender
Evie and Lois’ Go Ape birthday cake
How to make Grandad Colin’s painted cake
How to make a quick Ice cream splat cake
How to make a Baymax birthday cake
Almond shortbread recipe and the cute button cookie cutter

Haha so cute, you even got his expression, (or lack of), spot on. I also love the name and the little accessories like the candles on his cake. brilliant work Em.